15 Acres of Adventure in the Heart of Leicester

Tuesday 9 February 2016

10 Steps to Successful Archery Shooting


10 Steps to Successful Archery Shooting


Stance


The archer stands upright in a comfortable, relaxed position with feet at right angles to the target. The feet should be about shoulder width apart. When Shooting the body position should remain as steady as possible with no shifting of weight or leaning of the body. When instructed pick up the bow and hold in the table top position. 


Nocking the Arrow


Nock the arrow by placing the nock of the arrow onto the bowstring at the nocking point. Make sure that the odd coloured fletching on the arrow is facing up and the nock is pushed firmly onto the bowstring listen for the click. The arrow shaft is placed onto the arrow rest.


Which hand is which?


Drawing Hand
Index, second and third fingers are used. Curl the fingers around the bowstring so that the first joint of all three fingers sit on the bowstring. During the draw maintain an even amount of pressure on all three fingers.


Bow Hand


Hold the Bow between thumb and index finger where it makes a V. During the draw, the force should be taken on the palm and directly into the wrist. The fingers should remain relaxed. 


Bow Arm & Pre Draw

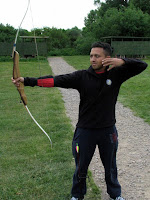
Push out the bow arm towards the target so it is straight then raise the bow arm and drawing arm together, up to the position shown in the picture on the left. Keep the front shoulder in its normal low position. The shoulder must not be allowed to rotate up or back as this shortens the draw length. Keep the elbow of the drawing arm high, as this will help use the back muscles needed to draw the bow to full draw.


Drawing The Bow

Draw the arm backwards in one smooth motion until the drawing hand is placed against the face, with a high elbow to make a T-shape. The position of the head and body should not move. An equal amount of push on the bow hand and pull on the drawing hand will keep the body balanced. 


Anchor

The Anchor is where the drawing hand is positioned on the face. The thumb is tucked away in the palm of the hand with the bowstring touching the face.

To ensure consistency in shooting your anchor should be the same.


Aiming

Aim by looking down the line of the arrow and centring it to the target. It is natural for the bow to move around as muscles try to hold it steady this will improve with time and practice.


Release

To release the arrow correctly, the fingers holding the bowstring must allow the string to slip off the fingers at the same time. This will let the bowstring pull away from the fingers with the least amount of deflection. When the release is done correctly, the hand should move backwards to rest behind the neck. Flexing the finger muscles will create a loss of power in the shot.


Follow through


Stay in this position until the arrow hits the target.

As the arrow slides along the arrow rest any movement of the bow will affect the arrow.


Relaxing


The archer should relax after each shot to allow the muscles to recover from their effort. About 20 to 30 seconds should be enough time for the muscles to recover, ready for the next shot. If not enough time is allowed between shots, then the muscles will tire rapidly and may even become sore. Tired muscles will not be able to perform consistently.


Taster Archery sessions are available at the Leicester Outdoor Pursuits Centre.
LOPC also runs Archery Instructor courses in the East Midlands.
24th European Archery Championship which will take place 23-29 May in Nottingham, England

Tuesday 2 February 2016

Getting Started Paddle Sport


So you want to be a Kayaker?


 By David Robinson BCU Level 3 Coach.

So youve always been a bit interested in canoeing and/or kayaking but you dont know where to start. Well hopefully this guide will give you an idea of what you can do and how to get started, and do it safely.

But isnt it an expensive sport?
Well its as expensive as you want it to be. You can spend lots of money on all the ‘Guccikit straight away, or you dont even need to buy a thing, opting to hire what you need when you need it. You can pay lots of money on lots of coaching to quickly build up your skills, or gather experience slowly - paddling on trips and joining a club. And with that in mind here is a step by step guide to getting involved.

Step 1 – The Taster


It is always good to try something before jumping in at the deep end, so best to have a taster session first. Why not try a taster session at the Leicester Outdoor Pursuits Centre? Here you will learn the absolute basics such as how to sit in a boat, how to hold a paddle, how to move the boat, how to get in and out and what to do if you fall in. You can do this at an outdoor centre or a canoe centre or possibly at your local club. A good resource is the Go Canoeing Website. Here they list where you can find ‘Canoe Startersession up and down the country.

*Note at this point you especially dont need to buy an kit, as generally the safety kit is all provided.

Step 2 – Learning how to paddle


Unless you have a friend to show you, there are two options to go for. An Introduction to Canoeing Course will give you the basics in paddle sport. By the end you should be able to move your boat with some confidence from A to B generally in a straight line. Youll also be able to manoeuvre your boat in a variety of ways and also capsize without panicking. You can then follow the British Canoeing Star Awards that landmark your progress as you develop in the sport.

Alternatively Option 2 would be to join a club and learn off other people who are regular enthusiasts. Here you can make friends with other paddlers and learn a lot just from socialising and talking about paddle sport. Most clubs will also have qualified coaches and experienced paddlers who are always keen to teach and coach new paddlers.

Personally I would recommend doing both. A professional course will give you quality coaching set against a clear syllabus helping you to progress effectively, and then the club will help you to practice those skills in a safe environment and make friends with like-minded soles.

*Note at this stage you still dont have to buy any kit, you should be able to use the clubs or centres.

Step 3 – Becoming a paddler


After gaining your British Canoeing 1 Star Award you may decide to improve those skills to paddle more efficiently. A 2 Star course will improve those skills as well as teach the basics of how to perform rescues, making you much more confident on the water and no longer feeling like a beginner.

You may also want to start looking at trips on the water, (after all this is why we got into it isnt it?). Again the Go Canoeing website has ‘Guided Tourslisted as well as ‘Trails, which will give you something more than just a quick splash about on the water.

If your club is quite active then Im sure theyll also have organised trips you can enquire about too.

Step 4 – Decisions


By now you should know whether paddle sport is something for you.

If you have decided to carry on one question you may want to answer is – What is it about the sport I like and want do I want to do? There are many disciplines in paddle sport including: touring, flat water racing, white water racing, slalom, sea kayaking, white water rivers, kayak surf, canoe camping, freestyle and polo plus many more.

Knowing what you want to do will help you decide what to purchase. You dont want to spend £500 on an expensive dry suit if youre going to be playing Canoe Polo which mainly takes place in a swimming pool. And likewise you dont want to be taking a Canoe Polo boat down a river with white water rapids. With all the different disciplines there are a lot of different pieces of kit on the market, so its good to seek advice on whats the most appropriate kit for the paddling you want to do.

You generally get what you pay for in kit so its up to you what you choose to buy. There is always a lot of second hand kit on the market. I would suggest taking your time and collecting items as you need them, buying some warmer kit to wear in the winter and having your own buoyancy aid and helmet will make things more comfortable on the water, followed by purchasing your own boat once youre satisfied with what type of paddling youre most interested in.

Finally – ALWAYS Remember safety


Paddle sport is an inherently dangerous sport that brings with it a risk that is always present. These risks can be easily managed but only with experienced paddlers. I would strongly recommend not going out paddling on your own while youre picking up your initial skills. Once youve been paddling for a while you can then start making your own assessments, but always seek advice from other coaches and experienced paddlers.

For more information about the Leicester Outdoor Pursuits Centre